There are strong geographical similarities between the Light and Dark Worlds, but the details are drastically different. The Dark World is crawling with twisted monsters the likes of which Link has never before seen. The ground, air, and water are all befouled, the rocks look more like skulls, and, thanks to the absence of several bridges (both natural and man-made) and the presence of additional obstacles, it's considerably more difficult to get around. Meanwhile, there are now more and tougher guards and monsters in the Light World, possibly an effect of the power seeping from the Dark World.
Link is currently restricted to a relatively small section in the eastern part of the world (plus the part of the mountain he could reach earlier, from the warp tile there). All other areas are inaccessible due either to missing bridges or to strange purple pegs that are unaffected by anything in Link's arsenal.
Not counting the Death Mountain and Misery Mire areas, the Dark World is effectively split into three regions by barriers that aren't crossable with current items and equipment.
In a Randomizer run, each of the other two sections are reachable as soon as you have the Moon Pearl and Power Gloves and either the Hammer or the second pair of Gloves. Aside from beating Agahnim, you can reach this eastern zone from the northwest by swimming across the river with the Flippers, from the southwest by swimming across the lake with the Flippers or using the Hammer to cross the bridge, or from the Light World by using a warp tile south of the Eastern Temple accessible with the Hammer and Power Gloves.
As mentioned before, beating Agahnim is usually optional in a Randomizer run, though sometimes he's your only Dark World access. It's also possible to require him for reaching the eastern section without needing him to reach the rest of the Dark World, but for that you'd have to find both Gloves for access to the other areas without finding either the Hammer or Flippers, and even that can be circumvented by sequence breaking with the Fake Flippers glitch.
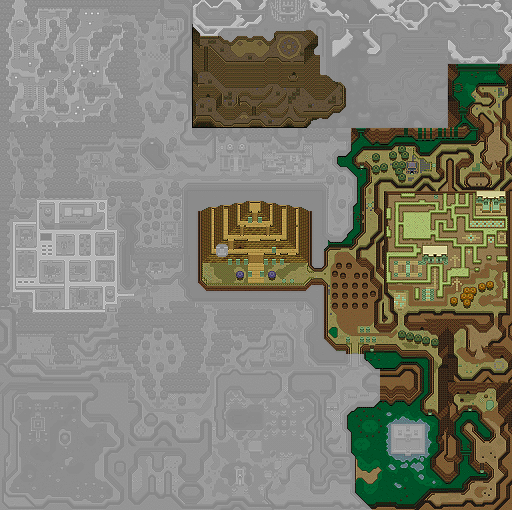
Also, there's a whirlpool shortcut for those who can swim, connecting the eastern lake with the river in the northeast. These are in locations corresponding to the Light World whirlpools in eastern Lake Hylia and near the witch's hut. No other whirlpool warps exist in the Dark World.
Near the base of the pyramid is a crack in what looks like a sealed doorway, but even Bombs have no effect.
After exploring for a while, Link finds a sign by the lake at the river's source, one of the limited areas accessible in the Dark World.
ワザワイあれ!
throw things into this pond!
something into my circle of
stones.
Toss something into the interesting circle of stones in the pond (I recommend the sign for bonus irony points). A large catfish surfaces with a rumble...
のは、お前か? これをやるか
ら、あっちへ行ってくれ!
my nap? I'll give you this,
so go away!
peaceful nap? I will give this
to you if you go away!
The catfish tosses at Link a large golden coin with a wavy pattern engraved on it.
地面をゆるがし 敵を封じる。
でも、魔法メーターに注意!
It rocks the ground and seals enemies.
But watch the magic meter!
Its magic causes the ground
to shake and defeats
nearby enemies!
Watch your Magic Meter!
Using Shake eats up Link's magic meter (32 magic, or 1/4 of a full bar, for one use), but can be worth it. When he uses it, Link spins around three times, then leaps into the air and plunges his sword into the ground. Shockwaves radiate out, shaking everything and affecting most non-flying enemies. Some die outright, some are left immobile for a fairly long time, and many, oddly, are transformed into mindless frail monsters that look like moving vegetables with faces.
Japanese folklore includes catfish that cause earthquakes, so that explains that.
Link heads toward where the Eastern Temple would be in the Light World.
Along the way, you can hop in the river and use the Mirror to conveniently grab the Bottle from the guy under the bridge if you haven't already, and continue into the lake and Mirror from a suspicious shallow area to land on the previously unreachable island in Lake Hylia to collect a piece of heart.
Instead of a series of cliffs, the area outside the Temple of Darkness has what amounts to a hedge maze. Nearby is small building with a plant-man inside.
お前さんも、『黄金の力』を
求めてこの世界へ来たのかね?
でもな、『黄金の力』は、さい
しょにそれに、ふれた者だけが
使える力だったんだ。
その男が、この世界をつくる事
を願った…、この世界はその男
の心をうつした世界なんだ。
オレも、よくに目がくらんで、
ここへ来たんだが、そういう者
は、みなモンスターになった。
この世界をもとの聖地に戻す
には、その男を倒し、『黄金の
力』を持つにふさわしい者が、
それを手にするしか方法は、
ないだろう…。それまでおれは
この姿でまっているつもりだ。
しかし、先住の民もいたずらな
物をのこしたもんだ。『黄金の
力』…『トライフォース』か…
I suppose you came to this world
seeking the Golden Power, too?
But, you see, the Golden Power
is a power that only the one who
was first to touch it can use.
That man wished to create this
world... this world is a world that
reflects that man's heart.
I came here too, blinded by
greed, but all such people
became monsters.
I doubt there's any way to restore
this world to the sacred land it once
was, unless someone worthy to
claim the Golden Power overthrows
that man and takes it... I plan on
waiting in this form until then.
But those who came before sure
left a mischievous thing behind. The
Golden Power... the Triforce...
Did you come here looking for
the Power Of Gold?
Well, you're too late. It will
obey only the first person who
touches it.
The man who last claimed the
Power Of Gold wished for this
world. It reflects his heart.
Yes, I came here because of
greed for the Golden Power,
and look what happened to me...
To restore the Golden Land, a
person worthy of the Golden
Power must defeat the man who
created this place...
Until that time, I am stuck in
this bizarre shape.
But what a mischievous thing
to leave lying around...
The Power Of Gold...
Triforce...
As Link navigates through the hedge maze, a monkey starts following him.
何よりも、ルピーが大好き。
あんた10ルピーくれるかい?
I love rupees more than anything.
Gimme 10 rupees?
I love Rupees more than
anything. Can you spare me
10 Rupees?
It's unclear whether the kiki is supposed to be a name as such, or just a monkey screeching noise it makes.
Yeah, whatever. It could come in handy, and 10 rupees is practically nothing.
しばらく、あんたのおともを
してやるぜっ キッキキ~!
I'll be your buddy for
a while ki, ki ki!
will accompany you for a while.
Kik kiki!
Before long, they reach the temple. The entrance is sealed, and there are several large monkey statues around. Hmm...
ここの入口を開けてやっても
いいぜっ。キキッキキッ!
entrance here if you gimme
100 rupees. Ki ki, ki ki!
Rupees, I will open the
entrance for you. Ki ki ki!
It looks like there's no choice. Fortunately, money isn't too difficult to come by, and 100 won't break the bank.
じゃあ100ルピーはいただい
とくからなっ! キッキキー!
Then I'll be taking your
100 rupees! Ki, ki ki!
100 of your Rupees. Kik ki ki!
The monkey hops around, hitting a few hidden and unreachable switches, and the entrance opens...
Here in the Dark World, the temples are larger, the music and decorations are creepier, the monsters are tougher, the layouts are more confusing, and the quirks are quirkier. This particular one has numerous dark rooms and seemingly invulnerable headless turtles, and introduces as ordinary fixtures tiles that warp Link between different rooms (these were in previous dungeons only in optional secret rooms), collapsing floors, odd... braziers?... that shoot fireballs at Link at regular intervals, strange moving whack-a-mole-like barriers sticking out of the floor, and jellyfish that periodically electrify themselves, shocking Link if he tries to hit them with melee attacks. It also has a unique puzzle that requires Link to shoot an arrow into the eye of an oddly-colored cyclops statue.
Not far into the area, Link finds a telepathic tile:
私よ、ゼルダよ。
私は今、デスマウンテンにある
カメイワのなかに封じ込められ
ているの。あなたが、来てくれ
るのを信じてまっています…
It's me, Zelda.
I am currently being confined
inside Turtle Rock on Death
Mountain. I'm waiting, believing
that you will come for me...
It's me, Zelda. I am locked in
Turtle Rock on top of Death
Mountain. I know you are doing
your best, but please hurry...
The Temple of Darkness continues the trend of dungeons with healing rooms. Bomb through the east wall from the map chest to find three faeries.
The big key is harder to get to than ever before, and involves bombing the floor of a bridge and jumping in. The big chest, on the other hand, also involves bombing through a wall, but is otherwise relatively straightforward other than the maze-like dark room on the way there, and contains...
くい なんかバンバンたたけ!
他にもバンバンたたけたたけ!
BAM BAM pound the likes of stakes!
BAM BAM pound, pound other things too!
You can drive the wooden
stakes down into the ground!
You can use it to pound on
other things too!
Yes, the original really is that silly...
A precise Bomb Jump, dubbed the Hammeryump, can let you sequence break to the chest from the collapsing bridge that passes by it. This can be particularly helpful in Randomizer runs, especially if keys are shuffled beyond their usual dungeons, since it gives access to the big chest without having to navigate the dark room or spend a key to unlock it. On that note, the Randomizer's usual restriction against keys locking themselves in with other things prevents either the dark room or the big chest from having small keys for this dungeon, even though the original game has a small key in the dark room.
The Magical Hammer (as it's called in the menu screen; let's forget the awkward joke) can pound down the whack-a-mole barriers in the temple (and some other indoor areas), the purple pegs outside in the Dark World, and the wooden stakes in the Light World, allowing Link to pass them. It also works as a weapon, causing twice the damage (usually) of the Master Sword, but is too slow and short-ranged for effective use on most enemies. In this dungeon, it also flips over nearby turtle monsters, making them vulnerable to attack until they manage to flip back over. As a fun and useful side application, the Hammer shatters frozen enemies in a single hit, which usually makes them drop magic jars.
After fighting off hordes of turtles in a series of dark rooms, Link finally reaches the boss's lair. It looks like a demonic scorpion with a protective mask on its face. Hitting the mask with the Hammer or with Bomb explosions damages it, until it breaks off completely, revealing a large, vulnerable-looking, green gem-like obvious weak point in the beast's forehead... it's clobbering time! The boss moves faster without its mask, but it can't take much more of a beating, so Link finishes it off quickly. It does the usual explode-and-drop-a-heart-container thing, and then a Crystal falls into the middle of the room. Link picks up the Crystal and finds that one of the seven maidens is trapped inside.
魔族の手から、のがれる事が
できました。ありがとう…。
…この世界も、もともとは、
『トライフォース』のおかれた
聖地だったの。
でも、それを手に入れた男…
盗賊のボス『ガノン』の悪しき
願いにより、こんな世界に…。
彼は、力をたくわえると私達の
光の世界をも支配しようと
たくらんでいたようだわ。
そして、私達賢者の力をうけつ
ぐ7人の娘をカギに使い、封印
を解き、さらにお城のあたりに
もっと大きな力の通り道を開く
つもりなの。でも、その道は
まだ開ききっていないわ。
まだ、まにあうわ。私達が、
7人そろえば、ガノンのひそむ
結界もやぶれるはずよ。
他の娘達の場所は、私の力で
知らせましょう。あなたが、ガ
ノンを倒す事を信じています。
その時私達も、もとの姿に
戻るでしょう。
… … … … …
勇者の行く道がトライフォース
へと、みちびかれますように。
the fiend's clutches because
of you. Thank you...
...this very world was originally
the sacred land where the
Triforce was placed.
But by the evil wish of the man who
obtained it... the thief boss Ganon,
this world became as it now is...
It seems that he has come up with
a scheme to build up his power and
take over our Light World as well.
His plan is to open a passage of still
greater power near the castle, after
using we seven maidens who inherit
the power of the Seven Sages as the
key to release the seal. However,
that passage is not yet fully open.
We're still not too late. The seven of
us together should be able to shatter
the barrier that Ganon lurks behind.
I shall use my power to tell you where
the other maidens are. I believe that
you will defeat Ganon.
We should return to our original
forms then, as well.
... ... ... ... ...
May the way the Hero travels
be guided unto the Triforce.
escape from the clutches of
the evil monsters. Thank you!
...This world used to be the
Golden Land where the Triforce
was hidden.
But because Ganon, the boss
of thieves, wished it the world
was transformed...
I'm sure he's intending to
conquer even our Light World
after building his power here.
He is trying to open a larger
gate between worlds near the
castle using our powers.
But the gate is not open
completely yet...
If we seven maidens come
together, we can break the
barrier around Ganon's hiding
place.
I will tell you where the other
girls are held. I believe you
will destroy Ganon.
I will return to my original
form at that time.
... ... ... ... ...
May the way of the Hero lead
to the Triforce.
The style of the last line feels a bit different from the rest of the conversation, so between that and the fact that every one of the maidens says exactly the same line, it's probably supposed to be a traditional prayer or blessing.
As always, Link is fully healed and does his little victory spin. His map now also shows where the other six maidens are...
For Randomizer purposes, the Temple of Darkness—which the community often calls "PoD" (pronounced as a word), short for "Palace of Darkness"—is unusually item-rich, containing a map, a compass, six small keys, and a big key (if these aren't shuffled beyond their usual dungeons), and five other items. That's a whopping 14 locations, counting what the boss drops. Logical access gets complicated, and I'll be using the ALttP Randomizer's spoiler log names here for convenience.
Only the Shooter Room chest (down the lefthand stairs near the entrance) never has any requirements beyond entering the dungeon. Map Chest and The Arena - Ledge (reached by going down the righthand stairs near the entrance) always logically require the Bow (unless enemies are randomized) due to a kill room along the way containing a red Mimic (which can also be bypassed by using the Potion Camera Unlock or Mimic Clipping glitches).
Here's where things start getting more complicated. If the Shooter Room chest doesn't contain a key, you have no logical access to the rest of the dungeon without a Bow. If it does contain a key, or if you have a Bow, then you also have access to The Arena - Bridge (cross the righthand bridge in the room past the entryway) and Stalfos Basement (jump down a hole in the room past the entryway and step on the button under the skull). Spending a key from this point gives access to Big Key Chest (Bomb through the lefthand bridge and go up the stairs). An unrelated locked door leads to Compass Chest (head north from The Arena and cross the collapsing bridge, then go east). From the Compass Chest, using another key leads to Harmless Hellway (the corridor with moving spike traps).
From this point on, everything else logically requires a light source, though racers will often go through in the dark if they don't have one. Dark Basement (down the stairs from Compass Chest) contains two chests; since this room has lightable torches next to the stairs, either the Fire Rod or the Lantern gives logical access. Spending a key in the collapsing bridge room leads into Dark Maze, which contains two chests and leads to the Big Chest, but has no torches and so logically requires the Lantern for all three chests (as noted above, Hammeryump can bypass this for the Big Chest, even without fumbling around in the dark).
Reaching the boss itself requires the big key, requires the Hammer unless enemies are shuffled (due to turtles in a kill room), logically requires the Lantern (because of torchless dark rooms), and requires the Bow even if enemies are shuffled (to shoot the statue).