The Powerful Gloves open several new areas. Let's start with the Light World.
Additional warp tiles to the Dark World were hiding under heavy rocks in the southeastern mountains, on the main island in Lake Hylia, and on the desert ledge right next to the #6 Ocarina dropoff point. One more warp tile, on a raised area behind a heavy rock in the far northeasten reaches of the mountains, appears after Hammering three pegs in the correct order (southeast, north, southwest).
Mirroring from locations previously locked behind these new warp tiles open up every remaining Light World location... except for a single cave in the eastern mountains.
In Randomizer runs, the "Floating Island" in the mountains is one of those locations that's convenient in that you can see what the item is in advance, often before you're able to collect it. In a regular playthrough, there's a piece of heart there.
"Checkerboard Cave" (named for its checkboard pattern of blocks) in the northeastern desert is another location that has a piece of heart in a regular playthrough. Although it conceptually goes with the Misery Mire locations, you don't actually need the Moon Pearl to get there, so the Randomizer could potentially expect you to go there without it.
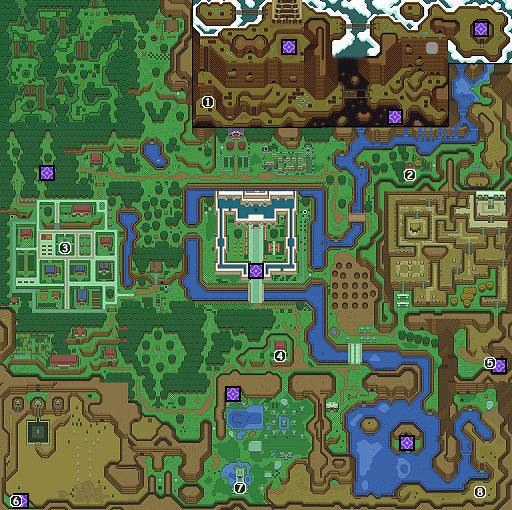
Thanks to the new warp tiles, everything in the Dark World overworld is now open, except for that creepy glowing tower and a few cave entrances on Death Mountain, and a bit of the pyramid.
Of particular note in a Randomizer run is "Hookshot Cave", under a large rock in northeastern Death Mountain. Most of the cave is only reachable by Hookshot (or Hovering), hence the name, and it contains four chests, in addition to being the access route to Floating Island. However, the first chest (the southernmost one) is reachable using only the recoil from dashing into things, so keep that in mind.
Also noteworthy in a Randomizer run is that the Powerful Gloves (Titan's Mitts) and Moon Pearl, by themselves, give access to the bulk of the Dark World through the warp tile outside Kakariko.
New locations that are significant in a regular playthrough are described in more detail below.
On the southern outskirts of the Village of the Lost, Link can lift heavy stones to reach a frog man:
えとこ見ると、ただもんじゃあ
ねえな。 そうだろ?
おれは、もともとカカリコ村に
住んでいたんだ。そう言えば
あいぼうはどうしてんだろなあ
あんた、頼むよ。
どうか、あいぼうにあわせて
やってケロッ。頼む!
your form didn't change, you ain't
no average guy. Am I right?
I used to live in Kakariko Village.
Wonder how my partner's
doing, come to think of it.
I'm gonna ask you a favor.
Please, let me see my
partner, ribbit. Please!
not change! You are not just
an ordinary guy, are you?
I used to live in Kakariko Town.
I wonder what my partner is
doing there without me...
Ribbit! I have a request of
you.
Please take me to my partner!
Please! Ribbit! Please!
The frog follows Link. When he warps to the Light World, the frog comes with him and becomes a dwarf. Link heads to the blacksmith's hut.
あいぼうをみつけてきたのかい
… うれしいじゃないかい…
また、ウチへよっとくれい!
そん時は、あんたの剣
ばっちりきたえさせてもらうぜ
partner and brought him back.
... so happy...
Stop by our place again!
We insist you let us temper
your sword up good then.
You found my partner!
... We are very happy now...
Drop by here again!
At that time, we will temper
your sword perfectly!
Link comes back a bit later (going outside and coming back in is enough)...
よく、来たね。
なんなりと言ってくれっ!
Glad ya came.
Ask for anything!
Welcome!
Ask us to do anything!
あずからしてもらうよっ!
to your sword for a while!
We'll have to keep your sword
for a while.
And so, Link is briefly swordless.
What happened to his other sword, anyway?
Might as well kill some time. There's a blue treasure chest in the Dark World where the blacksmith hut should be.
どうしても開かない。
とりあえず 持っていこう。
no matter what I do.
Let's take it along for now.
inside this chest, you can
never open it.
Just take it with you.
Acting on a hunch and some stray comments he heard earlier, Link tries taking the chest to the man sitting near the desert in the Light World.
Specifically, a thief in the Disorienting Forest mentions a rumor that one of their former members is at the entrance to the desert, and an NPC somewhere in the Dark World mentions a master lockpicker posing as a strange middle-aged man to hide that he used to be a thief.
知っているって?
なあ、宝箱を開けてやるから
みんなには、ナイショにして
くれないかい?
やくそくしてくれるかい?
I used to be a thief?
Here, I'll open the chest for
you, so could you keep it
a secret from everyone?
Promise me?
be a thief, right?
Well, I'll open a chest for you.
Will you keep it secret from
everyone else?
Would you please promise?
Inside is the fourth and final Bottle. Link returns to the blacksmith hut, where the sword should be ready by now.
Sword tempering seems to run on the same logic as Magic Powder brewing, so just move to another overworld screen (or go through a Mirror portal) and come back, and they'll be done. The Bottle fetch quest isn't necessary for them to finish, or even relevant other than forcing you to leave the area.
そら、かかげてみなっ!
Here, try holding it!
Now hold it!
体の中から 力が
わいてくる様だっ!
It's like power's boiling up
from inside my body!
You can feel the sheer power
flowing through your body!
The newly tempered Master Sword glows red, makes an even deeper sound when swung, and hurts twice as much (usually) as it used to.
The ALttP Randomizer randomizes both the chest contents and the reward from the blacksmiths, unsurprisingly, but also removes the delay in getting the reward. These two items are collectively referred to as the "Smith Chain". Having the Mirror, ideally along with the Ocarina (which flies the chest with you), makes these checks go quicker. If able to, runners will often visit the Magic Bat while doing the Smith Chain, and also check another location right outside the smithy in the Dark World ("Hammer Pegs") that has a piece of heart in a regular playthrough,
The warp tile in the middle of Lake Hylia grants access to the next labyrinth.
The ALttP Randomizer's Inverted mode puts an opening in the wall around the dungeon entrance, so no Gloves are needed to enter.
This place is rather... frozen. Some floors are covered with slippery ice, ice golems (immune to everything except the Fire Rod and Bombar Magic) occasionally pop out of the walls, and there are even demonic penguins (which, amazingly, fall to a single hit from Bombs or the Hookshot). This dungeon also has a unique sort of statuary with long tongues, some of which can be pulled out and act as switches. However, the worst part of this labyrinth is trying to navigate it, as it's even more maze-like than the previous ones.
If playing a Swordless Randomizer seed, some rooms have Bombar tiles added that allow you to use that spell while standing on them. On that note, entry to the dungeon logically requires the Flippers and Powerful Gloves (Titan's Mitts) to access the warp tile, and the Fire Rod or Bombar to kill the enemy in the first room.
Just inside the entrance, Link finds a telepathic tile:
の炎、お前を守ってくれる
だろう…。
large and small, should
protect you here...
protect you inside this icy
dungeon.
There isn't much to go on, but the speaking style seems to be Sahasrahla's. It's not Zelda's, at least.
Deeper into the labyrinth, skeletons drop from the ceiling. They collapse when Link hits them, but won't die. Another telepathic tile gives a clue, though.
剣だけでは倒せないわ。くずれ
た時に、とどめをさすのよ。
swordsmen with just your sword.
Finish them off when they're collapsed.
Skeleton Knight with the sword
alone. When he collapses, he is
vulnerable to another weapon.
The feminine Japanese implies this is Zelda.
That's only somewhat helpful, but it turns out that Bombs kill them when they're collapsed (one of a few practical uses of Bombs as weapons).
Even further in, in a large room full of ice, Link finds yet another telepathic tile:
るでないぞ。魔法のクスリを
持っておらぬのならば、
心して、奥へすすむがよい。
むりをするでないぞ…。
power. If you do not carry Magic
Medicine, then be very cautious
about advancing into the depths.
Don't overexert yourself...
magic power if you do not
possess the Medicine Of Magic.
Now, get ready to go into the
depths of this dungeon.
The "old man" Japanese implies this is Sahasralah speaking.
Finally, after much trouble, Link finds the big key and backtracks to get to the big chest.
敵からうけるダメージを
へらしてくれる。うれしい!
It decreases the damage I
take from enemies. Sweet!
This armor reduces the damage
that you take from enemies!
服 (fuku) is a generic term for clothing, but "tunic" fits better when taking context and appearance into account. "Mail" doesn't so much. Also, うれしい (ureshii) generally translates to "happy" or "pleasant", but it sounds rather silly to use either as an exclamation in English.
After finding the Blue Tunic, Link's tunic does visibly turn blue, and his hat turns a light tan to match, I guess. As stated, he also takes less damage from most attacks, usually half as much as before, though some damage is reduced less, and some not at all.
The rest of the labyrinth is fairly tricky, requiring Link to do a lot of backtracking just to get a block to hold down a switch.
Though you could always go on ahead to the next dungeon and grab the Staff of Somaria to avoid most of that... Also note that there are two large pots in the room just north of the button that needs to be held down; jumping in either one from the floor above leads to an uncharted room with three faeries.
The GBA version of the game redoes the puzzle, replacing the pushable blocks with one big liftable block, and changing the room below to have a one-way obstacle with whack-a-moles and pushable blocks. This arguably makes it more obvious what you're intended to do, and removes any guesswork about which block to push, but negates the workaround entirely. Unsurprisingly, speedrunners aren't pleased with the change. (The version differences page on TCRF also claims the redesign makes two rooms from the original unreachable, but I didn't notice anything like that in the video I watched... unless the unmodified versions of the redesigned rooms are still in the game data?)
The boss is a big pink snowball with an eye, and it's surrounded by a huge chunk of ice. Blocks of ice fall at Link from the ceiling periodically just to be annoying. The only things that affect the huge chunk of ice are the Fire Rod and Bombar magic. When it melts, three snow-eyeballs are revealed that slide around randomly until Link kills them. The sword works, but the Fire Rod is faster, assuming Link has enough magic left to keep using it. Explosions, heart container, crystal.
魔族の手から、のがれる事が
できました。ありがとう…。
ハイリアの民は、ふしぎな力を
あやつることが、できたと言い
ます。7賢者もそうだったの。
でも、長い年月の間にハイリア
の血はうすれ、7賢者の血を
ひく私達も強い力はありません
ただ、勇気を司どるナイトの力
があれば、知恵を司どる賢者の
力もより大きくなるはずよ!
お城にできた、光と闇をつなぐ
道が、完全に開くまで
もう、あまり時間がないわ。
ガノンを倒せば、この闇の世界
もなくなり、トライフォースは
また、つぎの持ちぬしが、
現れるのをまっているはずです
あなたを信じています。
… がんばって…。
勇者の行く道がトライフォースイ
へと、みちびかれますように。
the fiend's clutches because
of you. Thank you...
It is said that the Hylians were
able to control marvelous powers.
So, too, could the Seven Sages.
But the Hylian blood has thinned over
time, and we who carry the blood of the
Seven Sages also lack strong powers.
With the power over courage of the
Knights, though, the power over wisdom
of the Sages should increase as well!
There is little time now until the portal
formed at the castle that connects
Light and Dark opens completely.
If you defeat Ganon, this World
of Darkness should also vanish,
and the Triforce again await the
appearance of its next owner.
I believe in you.
... do your best...
May the way the hero travels
be guided unto the Triforce.
escape from the clutches of
the evil monsters. Thank you!
They say the Hylia people
controlled mysterious powers,
as did the seven wise men.
But the blood of the Hylia has
become thin over time. We who
carry the blood of the seven
wise men do not possess strong
power any more, either.
Our powers will increase if we
mix the courage of the Knights
with the wisdom of the wise
men. Only a short time remains
until the gate at the castle
linking the worlds opens
completely. If you defeat
Ganon, this world will vanish
and the Triforce will wait for
a new holder.
I believe in you...
Good luck!
May the way of the Hero lead
to the Triforce.
For Randomizer purposes, the Ice Temple contains a map, a compass, two small keys, and a big key (if these aren't shuffled beyond their usual dungeons), and three other items. The first chest has no special requirements beyond entry to the dungeon, and neither do two others. The big chest requires the big key and whatever it takes to get that. The other four chests, and the boss itself, may logically require the Hookshot, depending on key placement. One of these four chests additionally requires the Hammer, and so does reaching the boss (both of these also require Power Gloves, normally a non-issue). Reaching the boss also logically requires the big key (though either of the shortcuts noted below can bypass this), and may logically require the Staff of Somaria as well (to hold down the button) depending on where the keys spawn (since, if not shortcutting, you need a key to open the room to flip the crystal switch to push the block into the hole to use it below).
One of the chests with no additional requirements is easily overlooked by those more familiar with the original game and less familiar with the ALttP Randomizer; it's in the room above the big chest, appears after melting both ice golems in the room, and contains 3 Bombs in a regular playthrough.
The dungeon also has two small keys dropped by enemies and one under a large block behind some whack-a-moles; these are not randomized and will always be in their usual locations. The first dropped key is in the second room of the dungeon and must be used immediately to continue on, so can't affect routing.
A large part of the frustration of this dungeon is wanting the crystal switches set to blue to push the block to hold down (or even just more easily reach) the button to open the door to head toward the boss, but the dungeon forcing you to set it to orange to get past an earlier room where an orange barrier otherwise blocks the way. To drastically cut down on time spent in the dungeon, runners frequently bypass this using the Ice Palace Bomb Jump (IPBJ), a tricky, probably pixel-perfect, diagonal Bomb Jump to get around the barrier without lowering it. My understanding is that most runners line themselves up by comparing Link's hat to the bottom of the north wall, or holding out the sword and comparing its positioning to the Bomb's shadow. I've never quite gotten the hang of it, personally.
Other Bomb Jumps are also fairly often used in here, typically to get through the Hookshot room without the Hookshot, or to skip past the pit in front of the eastern door of the room above the big chest to get from one side to the other without a lot of circling around.
A more recently discovered and permitted glitch, Icebreaker, gives runners with the Staff of Somaria another way to shortcut the dungeon that leads to more chests sooner, and is probably a bit quicker overall for clearing the dungeon. And since I've gotten pretty good at doing it, here are the steps:
At the early room with the penguins and the button under the skull that opens the doors, continue east to enter the room that has the big key chest mockingly out of reach. Hold right until you're as far east as you can go (not very), then tap left and swing your sword (or press Start or Select) to interrupt Link's movement. The goal here is to get just barely into the doorway (the black border on the back of your shield aligning with the black border along the doorway helps indicate correct positioning). Once in place, hold down and right. If you were in the correct spot, Link will get "caught" on the barrier and not move downward. Release down and right, making sure that Link doesn't move at all while doing this (it may help to enter the menu). Without moving, use Somaria to drop a block. If placed correctly, the black outline of this block and the black outline of the barrier will overlap. Now, move exactly one pixel to the left (again, swing your sword or press Start or Select to interrupt movement). If done correctly, the outlines of the block and the barrier will be just touching, but not overlapping. At this point, all you need to do is hold down, and Link will be forced east all the way through the barrier to the side with the chest!
The ALttP Randomizer wiki tells me that Icebreaker is an application of the more general Door State Extension glitch. To the best of my understanding, here's what's going on: All of the setup steps are to make the game think Link, and the block, are inside the doorway. Upon pressing down at the culmination of the glitch, the block can't be pushed down because of the doorway state, and the game doesn't want Link to be overlapping it, so it pushes him further into the room instead. Since there's no space at all between the block and barrier, he then keeps getting pushed to the right until he's in the clear on the other side.