Having the Hammer gives access to most of the Dark World, by either directly or indirectly (through newly reachable parts of the Light World) opening ways into its other two main regions.
Although not all of these options are available yet in a regular playthrough, here are all the (non-glitch) ways to travel directly between the three primary Dark World regions:
East to NW: Hookshot across river just north of broken bridge (also requires Power Gloves, Hammer, or Flippers to get to the Hookshot point).
NW to East: Use Flippers to cross river north of broken bridge.
East to SW: Hammer through pegs to cross bridge.
SW to East: Hammer through pegs to cross bridge, or use Flippers to cross lake.
SW to NW: Lift heavy rock south of village with Powerful Gloves (Titan's Mitts).
NW to SW: Hop off ledge south of village.
Similarly, the Hammer also opens up nearly all of the remaining inaccessible spots in the Light World, either directly by pounding through stakes or indirectly by crossing from newly reachable Dark World locations with the Mirror. Many of the locations that are noteworthy in a regular playthrough are explained in more detail below.
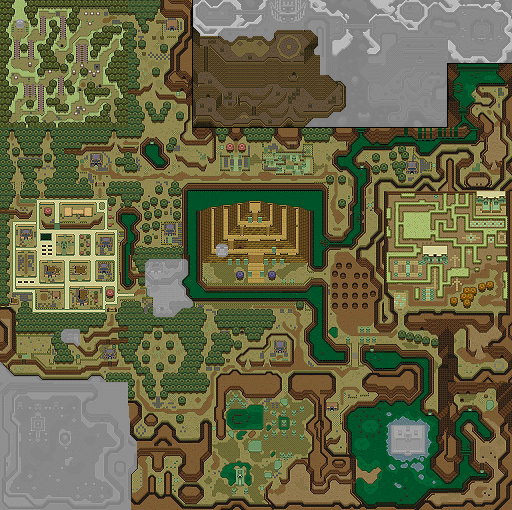
(This version of the Light World map also marks the locations of all currently accessible portals to the Dark World, including the Hyrule Castle gate.)
For the sake of completeness, here are all the ways to access the primary Dark World regions from the Light World, and their logical item requirements for ALttP Randomizer purposes. Note that the Moon Pearl is also required to do anything more in the Dark World than setting up a Mirror warp (on Death Mountain or in Misery Mire) or picking up the item on the pyramid after beating Agahnim.
East: Use the warp tile south of Eastern Palace (Hammer + Power Gloves), or beat Agahnim to open the warp at the castle (Master Sword + Lantern, or any sword + Magic Manteau + Lantern).
Southwest: Use the warp tile south of Link's house (Hammer + Power Gloves).
Northwest: Use the warp tile north of Kakariko (Powerful Gloves (Titan's Mitts) if approaching from the village side, or Hammer + Power Gloves if approaching from the forest side).
Using the Mirror inside the Dark World counterpart of the graveyard near the church lets Link reach a previously inaccessible large gravestone. It moves aside when he dashes into it, revealing a secret room with a treasure chest at the end:
You can also reach this location, dubbed "King's Tomb", from the Light World without warping once you have the Powerful Gloves (Titan's Mitts).
姿を消す事できるが、
魔法メーター気を付けろ!
I can turn invisible, but pay
attention to the magic meter!
You are invisible when you wear
it! Watch your Magic Meter!
When Link uses the Magic Manteau, he vanishes (his shadow remains visible for reference). This lets him completely avoid damage and walk past certain barriers. However, it rapidly consumes his magic power as long as it remains active.
In a grove of trees in the Dark World near the Bomb Shop where Link's house would be, he finds someone who seems to have turned halfway into a tree.
こんな姿に なっちまって。
… … …
モトの世界に いたころは
よく フエをふいて
あそんだものさ…。
… … …
どうぶつ達の集まる小さな
ひろ場、なつかしいなあ…。
そこに、花のタネといっしょに
オカリナをうめたんだ。
探してみてくれないか?
wandered into this world.
... ... ...
When I was in the world I'm
from, I used to enjoy playing
pipes a lot...
... ... ...
I miss the clearing where
the animals gather...
I buried my Ocarina there
with some flower seeds.
Would you try finding it for me?
I turned into this shape.
... ... ...
I enjoyed playing the flute in
the original world...
... ... ...
There was a small grove where
many animals gathered. I want
to see that place again...
I buried my flute there with
some flower seeds.
きみにわたそう … … …
頼んだよっ!
Shovel ... ... ...
I'm counting on you!
Good luck!
ほれる所なら、穴がほれるぞ
ほってみよう。
I can dig holes where it's diggable.
Let's try digging.
You can dig in many places.
You never know what you'll
find!
Link warps to the Light World. A specter of the boy is briefly visible, then vanishes. After digging around, Link finds something blue.
その音色は、ふしぎな力を
持っているはずだ!
The sound of its music ought
to have a mysterious power!
Its music surely has some
mysterious power!
Maybe they were afraid Americans wouldn't know what "ocarina" means. Of course, that's no problem since Ocarina of Time...
Link warps back to the Dark World and shows the Ocarina to the boy.
でも、ぼくはもう そいつを
吹く事は できないみたいだ。
キミに あずかってほしい
そして、ぼくの住んでいた村へ
行くことがあったら、
いねむりばかりしてる
ジイさんに、わたしてやってよ
… … …
ああ、いしきがうすれてきた…
お願いだ、さいごにそいつの
音色を きかせておくれよ…
But it doesn't look like I
can play it anymore.
I want you to hold on to it.
And if you ever go to the
village where I used to live,
give it to the old man who's
always dozing off.
... ... ...
Ahh, my consciousness is fading...
Please, let me hear the sound
of its music one last time...
looks like I can't play my flute
any more. Please take it.
If by chance you go to the
village I lived in, please give
it to a tired old man you will
find there.
... ... ...
Well, my mind is getting
hazy...
Please let me hear the sound of
the flute one last time...
Link plays the Ocarina, and the boy turns all the way into a tree. In Kakariko Village, Link finds a dozing old man and tries playing the Ocarina.
むすこのオカリナ…!
むすこに会いなさったのか!
どこにおりますか、ゲンキでし
たか… … … …
そうですか… いや、何も言い
なさらんでも、そのカオ見れば
わかりますですじゃ。
そのオカリナは、あんたが持っ
ていて下さらんか…。
それで、むすこのかわりに、
村のトリにオカリナの音色を
きかせてやって下され…
どうか、お願いですじゃ。
むすこも、よろこぶでしょう…
… ただ、もう一度だけ、
むすこに会いたかった…。
Th-that's my son's Ocarina...!
Then you met my son!
Where is he, was he doing
well... ... ... ...
I see... No, you don't
have to say a thing, I can
see it on your face...
Would you please keep
that Ocarina...?
And, in my son's stead, please
let the village bird hear the sound
of the Ocarina's music...
Please heed my request.
It would please my son too...
... I just wish I could see
my son just one more time...
is my son's flute...!
Did you meet my son?
Where is he? Is he all right?
... ... ... ...
Oh, I see... Well, I can tell
what you want to say by the
look in your eyes...
Would you keep the flute?
And will you play its sweet
melody for the bird in the
village square?
I beg of you, please!
My son would probably want it
this way...
...But still, I wish I could
see him once more...
There's not much else Link can do here except play the Ocarina for the bird statue on the weather vane near the center of town. Amazingly, a strange bird (popularly known as "The Duck") bursts out of the statue and flies away when he does.
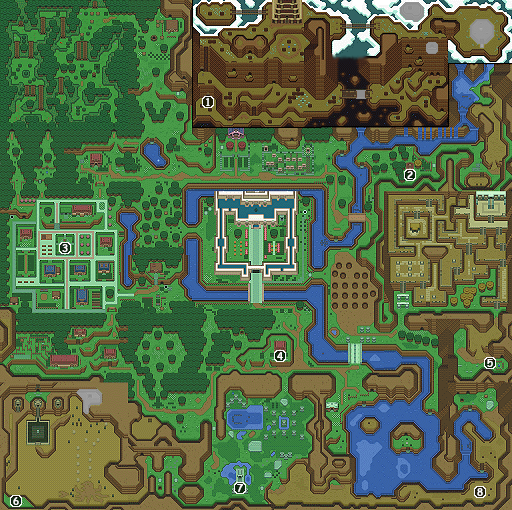
From this point on, if Link plays the Ocarina again anywhere outdoors in the Light World, the bird swoops down, picks him up, and carries him to a choice of eight preset locations around Hyrule, as indicated on the map. This makes getting around much quicker.
Particularly useful at this point are #1 for mountain access, #2 right outside the witch's hut for quick potion refills, #3 in Kakariko village for access to the northwestern Dark World tile, #4 at Link's house for the Dark World portals at the castle and in the swamp, and #5 right next to the eastern Dark World tile. #8 is also handy if you haven't picked up the Ice Rod yet, or want to visit the island in Lake Hylia for Bomb or Arrow capacity upgrades.
Curiously, one of the locations, #6, is on a previously-unreachable ledge in the desert, but all that's up there are two rocks too heavy to lift.
Unfortunately, spot #1 is placed at probably the least convenient possible mountain location that's actually in the mountains. It would have been more helpful if it were, say, in front of Hera Tower or at least next to the warp tile, or if there were a second destination in the mountains, perhaps at the opposite end in the far northeast.
Regardless, any mountain access is better than no mountain access, and in a Randomizer run, it's a way to get up there that doesn't require the Power Gloves or logically require the Lantern.
As long as Link's in the village, the Hammer lets him pound past a peg to jump in a cave by the smithy and find a creepy shrine in the bottom. On a whim, Link sprinkles some Powder on it, and a confused purple bat-like creature (popularly the "Magic Bat") appears.
In a Randomizer run, it may be worth noting that you can also access the cave entrance from the Dark World without the Hammer as long as you have the Mirror and Powerful Gloves (Titan's Mitts). And the Moon Pearl so you can use the Gloves, of course.
めざめさせて くれたなっ!
… どうも ありがとう。
やい、こうなったら おれいを
してやるから カクゴしろ。
… よろしいですか?
me from my long slumber!
... thank you very much.
Hey, I'm gonna pay you back
for this, so brace yourself.
... will that be all right?
from my deep, dark sleep!
...I mean, thanks a lot, sir!
But now I will get my revenge
on you. Get ready for it!
...Err, is that OK with you,
sir?
The bat-creature zaps Link with something that doesn't look terribly harmful, and a little 1/2 appears on top of his magic meter.
今までの2ぶんの1しか魔法は
へらんぞ…、よかったですね。
では、せいぜいがんばりやがれ
ごきげんよう さようなら~
Now your magic will drop half
as much... good for you.
Then, try your damn best.
A pleasant farewell~
misfortune! Now your magic
power will drop by one half!
Congratulations!
Now, do your best, even though
I'm sure it won't be enough!
Have a nice day! See you!
I can't tell whether it's saying that Link's magic capacity will decrease to half, or that his magic energy will decrease by half as much when used. It could be intentionally confusing, since the creature itself seems quite confused to begin with.
Well, whatever the bat meant, and however confused it may be, what it actually did was make Link consume magic at only half the normal rate, causing it to last twice as long. The benefits when using anything that involves the magic meter should be readily apparent.
The ALttP Randomizer changes the Magic Bat's gift to a random item (half magic is also treated as an item, and could be anywhere). Runners may use the Fake Powder glitch to activate the shrine if they have the Mushroom and Staff of Somaria, but not the Powder. Doing so is as simple as using up magic until there's too little to use Somaria, then attempting to use it anyway and immediately switching items to the Mushroom.
With the Ocarina, Link can more easily travel to the cave in Mount Hebra where the old man he met earlier lives:
司祭によって城のあたりで、
2つの世界がつながった様じゃ
闇世界へ向かうのならば、城へ
行きなされ。
worlds have been tied together
near the castle by the priest.
If you're headed for the Dark World,
go to the castle.
connected the two worlds
somewhere around the castle.
Atop the Light World mountain, Link can now follow the instructions on the tablet west of Hera Tower. After checking the incription, he holds up the Master Sword. A bolt of bright blue energy streaks from the sky, engulfing Link, then forms into eight balls of cold that circle around him before flying off in all directions. A large golden coin with a lightning bolt engraved on it falls from the sky.
大気や冷気をあやつる、魔法だ
魔法メーターに 注意しよう!
This magic controls cold and the atmosphere.
Watch the magic meter!
Its magic controls the upper
atmosphere and polar wind!
Watch your Magic Meter!
Using the Ether magic eats up Link's magic meter (with a base cost of 32 magic, or 1/4 of a full meter, for one use), but it can be worth it. When he uses it, Link quickly spins around three times, then holds his sword aloft. The same effect as described above happens, and it freezes or kills most enemies. It's similar to using the Ice Rod on everything nearby, though, oddly enough, the Ice Rod and Ether magic don't always have the same effect on the same enemies.
In the mountains in the Dark World below the magic portal exit is "Spike Cave", which Link can enter now thanks to the Hammer. The ground inside is covered with spikes, making it difficult to pass through alive. Using the Magic Manteau helps greatly, especially with half magic consumption, as do recovery medicine or bottled faeries. At the far end, beyond a large rock, is a treasure chest.
The Hookshot also helps a bit if you have it. The ALttP Randomizer's item placement logic, to the best of my understanding, determines whether it's fair to expect the player to brave Spike Cave based on a combination of total heart containers available, Bottles available, whether any invulnerability items are available, and possibly whether half magic is available. In all cases, the Moon Pearl, Hammer, and Power Gloves are entirely required.
ひとふりすれば、ヒカリのオビ
が、みを守ってくれるぞ。
With a single swing, a ring
of light will protect me.
If you swing it once, a ring of
light will protect you!
Much like the Magic Manteau, the Staff of Byra makes Link invulnerable, but drains his magic rather quickly. As an added bonus, it damages enemies that get too close (the same damage as Link's original sword) and knocks them away, though Link can't use his spin attack or the sword beams while the effect is active.
It's about time to head for the next labyrinth, in the southern swamp. First, though, using the Mirror not far to the west of the dungeon lets Link reach another tablet on a high ledge in the Light World, previously visible from the desert.
されば ボンバーの魔法を
えられん。
Thus shalt gain the magic of Bombar.
you will get the magic of
Bombos.
Link holds up the Master Sword. Flames spiral outward from where he stands, followed by explosions all around. Any vultures nearby burn up. A large golden coin with a spiral pattern engraved on it falls from the sky.
バクレツが地面を走る魔法だぞ
でも、魔法メーターに注意!
Explosions run across the ground with this magic.
But watch the magic meter!
Its magic makes the ground
explode with power!
Watch your Magic Meter!
Using Bombar eats up Link's magic meter (with a base cost of 32 magic, or 1/4 of a full meter, for one use), but it can be worth it. When he uses it, Link quickly spins in place three times, raises his sword, then touches it to the ground. The effect described above happens, generally setting nearby enemies on fire.
As with the Ether tablet, the ALttP Randomizer puts a random item here, and requires Mudora's Writings and the Master Sword or better (or Hammer in Swordless mode) to retrieve it. The inscription indicates what's here ahead of time if you read it before you can collect the item.
The ladder leading further in is too high to reach. Link can't go anywhere inside except to another telepathic tile:
それぞれの世界にある物は
たがいにその姿をまねておる
1つの物の姿がかわれば、
もう、1つもかわっておるはず
じゃ。よくかんがえるのじゃ。
exist in both Light and Dark
Worlds imitate each other.
If the form of one changes,
the other one should change
as well. Think well on this.
Objects exist simultaneously in
both worlds with similar shapes.
If the form of a thing changes,
it will affect the shape of its
twin in the other world.
The style is "old man" Japanese, so this is probably Sahasralah.
Link tries returning to the Light World. There's a similar structure in the same place, and inside is a lever that floods a channel corresponding to the one in the Dark World. When Link returns to the Dark World, he finds the channel there flooded as well, and can swim into the rest of the area.
Due to the floodgate puzzle, both the Mirror and the Flippers are required to do anything in the Swamp Temple. The whole setup feels kind of handwavey, though, since nothing else anywhere in either of the two worlds directly affects the other world like this. It's kind of a shame.
When using any Entrance Shuffle settings, the ALttP Randomizer keeps the outside drained and the inside flooded permanently once the lever is pulled, since there's no guarantee that the floodgate building entrance, the Swamp Temple entrance, and the exterior area will be anywhere near each other.
This temple has a lot of water, several more flooding levers, bugs that skim the water's surface, and annoying bouncing waterballs that just keep coming back even if destroyed unless frozen and Hammered. After a fair bit of exploration and some minor puzzles to reach the big key, Link can open the big chest:
のびて ちぢんでボヨヨ~ン!
色々な物に さしてみよう!
Extend, contract, booooing!
Let's try latching on to all sorts of things!
It extends and contracts and...
BOING! It can grapple many
things!
The Hookshot, similar to the Boomerang, stuns many enemies and even damages some (particularly useful against jellyfish, and nearly everything else in this temple), but has no effect on others. Also like the Boomerang, it will carry items to Link. Its main use, though, is to hook onto various things—trees, stakes, skulls, statues, and so on—and pull Link over to them, even across pits. This lets Link travel deeper into the temple...
Crossing more wetness, a door behind a waterfall, and a flooded room with a strong current leads Link to the boss chamber. The opponent this time is a large one-eyed giant-jellyfish-demon kind of thing, with many little puffs swarming around it. Link can't hurt it, but using the Hookshot will pull off the puffs one at a time, and Link can kill them while they're separated from the main body. Once they're all dead, the demon-squid-thing goes ballistic, but it's also vulnerable now, and rather predictable. A few hits later and it goes down. Explosion, heart container, crystal. The second maiden is trapped inside.
魔族の手から、のがれる事が
できました。ありがとう…。
…トライフォースは、それに
ふれた者の願いをかなえます。
その者が生きているかぎり…。
だからこそ、聖地におかれ
選ばれた者だけにその場所が
伝えられてきたの。
ところが、それがどこかで
とぎれてしまったみたい…。
そして、再び聖地をみつけた
のが、ガノンドロフと言う
盗賊だったのよ。
でも、幸いな事に彼は光の世界
へ帰る方法がわからなかったの
…そう、思い出して。
あなたは、勇者だけが使いこな
せるマジカルミラーをもってい
るじゃない!
ヘブラ山にあった魔法陣が
他にもいくつかあるの。
それを使って2つの世界を行き
来すれば、闇の世界にひそむ
魔物達も探しだせるわ!
盗賊ガノンドロフ…いいえ、
闇の魔王ガノンを倒せるのは
あなただけ…祈っています。
勇者の行く道がトライフォースイ
へと、みちびかれますように。
the fiend's clutches because
of you. Thank you...
...the Triforce grants the wishes
of the one who touches it.
As long as that person lives...
For that very reason, it was placed
in the sacred land, and its location
imparted only to a chosen few.
However, it seems that this failed
to be passed on at some point...
The one who then discovered
the sacred land once more was
the thief Ganondorf.
Fortunately, though, he didn't know
how to return to the World of Light.
...yes, think back.
You are the one who has the
Magical Mirror that only the
Hero can master!
Several other magic crests like
the one on Mount Hebra exist.
Use those to travel between the two
worlds and you can find the monsters
lurking in the World of Darkness!
You alone can defeat Ganondorf
the thief... no, Ganon the Dark King
of Fiends... I am praying for you.
May the way the Hero travels
be guided unto the Triforce.
escape from the clutches of
the evil monsters. Thank you!
...The Triforce will grant the
wishes of whoever touches it,
as long as that person lives...
That is why it was hidden in
the Golden Land. Only a select
few knew of its location,
but at some point that
knowledge was lost...
The person who rediscovered
the Golden Land was
Ganondorf the evil thief.
Luckily, he couldn't figure out
how to return to the Light
World...
...Well, remember that you
have magical powers, which only
The Hero can make the most of!
There are some other magical
warping points like the one you
saw on Death Mountain.
By using them you can go
between the two worlds and
find the evils hidden in the
Dark World. You are the only
one who can destroy
Ganondorf, the thief-no,
Ganon, the evil King Of
Darkness!
May the way of the Hero lead
to the Triforce.
For Randomizer purposes, the Swamp Temple contains a map, a compass, a small key, and a big key (if these aren't shuffled beyond their usual dungeons), and six other items. The first chest requires only dungeon entry, and is forced by logic to have the small key (unless keys are shuffled beyond their usual dungeons), since the very next door is locked. The chest behind a Bombable wall down the stairs also has no special requirements.
Everything else in the dungeon requires the Hammer due to a floodgate lever behind whack-a-moles. After reaching the central hub, the chest to the south has no further requirements. The two chests to the west of the hub ("Left Side Swamp") also have no further requirements, but are far enough out of the way that runners often prefer to skip them if possible. The big chest, as usual, requires the big key, wherever it may be. The remaining three chests and the boss battle, in the "back" of the dungeon, require the Hookshot to reach; however, they do not require the big key unless the Hookshot itself is in the big chest (as it is in a regular playthrough), since the big key doesn't open anything else. As a result, the big key can potentially be locked inside the big chest.
One of the three chests in the back is easily overlooked by those more familiar with the original game and less familiar with the ALttP Randomizer; it's in the waterfall room, appears after pushing the third block from the left, and only contains 20 Rupees in a regular playthrough.
The dungeon also has four small keys under skulls; these are not randomized and will always be in their usual locations. One is shortly before the boss room and opens the way in, while another is on a side ledge in the main hub and requires the Hookshot to reach. This Hookshot-required key opens the back of the dungeon in a regular playthrough, but is often used to unlock the west floodgate room in a Randomizer run, which makes doing the left side quicker if you remember to grab the key from the skull below before flooding it. Or use Diver Down to get to it despite the water.
The Diver Down glitch, which involves clipping through railings to jump down into flooded sections of rooms where the game never anticipated that happening, allows for a bit of shortcutting in a few places in the dungeon. Several setups for doing this have been found, involving either Bombs or the Staff of Somaria. The short explanation is that since you're only meant to enter the lower level from the stairs, only the bit of water right in front of the stairs actually puts you in a swimming state, and you can walk around as though the water weren't there if you manage to hop in anywhere else and avoid that small area. Runners using Diver Down in the west floodgate area often try to combine it with a well-timed Bomb explosion next to the crystal switch; if done just right, the blue barriers will remain down while walking south from the floodgate room, then the explosion will finish and flip the crystal to orange when returning north in the flooded part to get the key, allowing access to the vanilla big key chest when continuing west. The other common spot to use Diver Down is the flooded room with two chests in the basement, where it allows you to entirely skip both the delay involved in draining the water down there and the setup upstairs that would lead to the drainage lever.