The Power Gloves open up several new sections of the map, primarily the path to the river's headwaters beyond the witch's hut and a cave in the northwest that leads up the mountain. It also allows for several shortcuts here and there, and access to several scattered small caves hidden under large rocks.
In a Randomizer run, even without the Gloves, you can get up the mountain if you have the Ocarina, or to the river's headwaters if you have the Flippers and use a whirlpool to warp there. Both of these also work in a regular playthrough once you get them, of course, and will be explained in further detail once they appear.
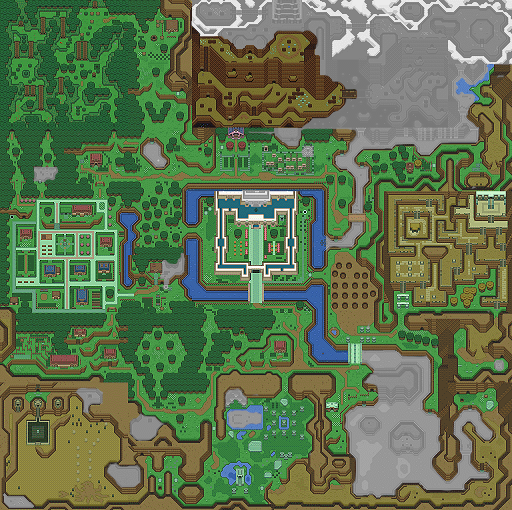
Now that Link has the Power Gloves, he can reach many new areas. One of them is a lake upstream where he meets the head Zora...
little man? Do you have
something to ask me?
500ルピーくれたら、うって
やっても良いぞ!
Give me 500 rupees,
and I'll let you buy them!
give flippers away for free.
I sell them for 500 Rupees a
pair.
よう。 それにもうひとつサー
ビスしてやるぞ。
川や湖を結ぶワシらだけの
秘密の水路を使わせてやろう。
うずまきを見たら入ってみろ。
それじゃあ、たいせつにしてく
れよ。 ワッハッハッ
さらばじゃあ~…。
some Flippers. I'll even throw in
a little something extra, too.
I'll let you use our secret waterways
that link the rivers and lakes.
Try going in a whirlpool if you see one.
Well then, take good care of
them. Wa, ha, ha!
So looong...
flippers coming up. I will
give you a free bonus with
your purchase.
I will let you use the magic
water ways of the sea folk
which link lakes and rivers.
When you see a whirlpool, dive
into it. You never know where
you'll surface! Wah ha ha!
これで水の深い所も
スイスイおよげるはずだ!
I should be able to swim just fine even
where there's deep water with these!
With these you should be able
to swim even in deep water!
Flippers aren't required for progression until the Swamp Temple (or the Ice Temple if going there before Swamp) but you might as well get them now unless you're trying to minimize your total time.
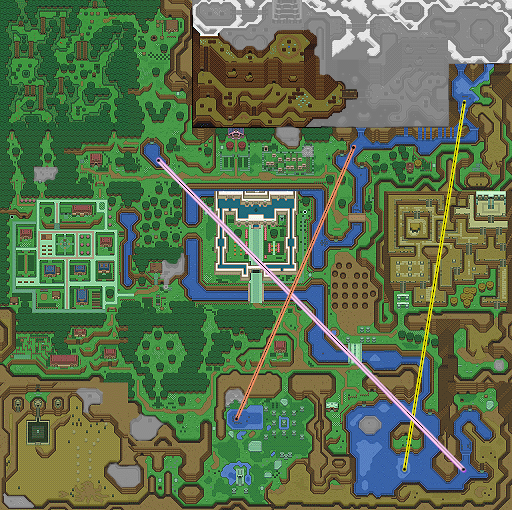
Having the Flippers unlocks all the reachable deep water in Hyrule, much of it in Lake Hylia in the southeast, though there's still an island with something on it (a heart piece in a regular playthrough) that can't be reached. The whirlpools mentioned above function as warps, connected in pairs as indicated on this map. Three new locations of interest also open up, as detailed below.
As noted above, the Flippers and whirlpool give access to the river's headwaters even without the Power Glove, which can come in handy in a Randomizer run. The whirlpool in the swamp is also used reasonably often as a shortcut from Link's house to the witch's hit. The third warp is rarely used, but it couldn't hurt to keep it in mind.
Runners may also use the Fake Flippers glitch to circumvent logical requirements and swim without first getting the Flippers, usually starting from a screen transition on the south shore of the lake. Althernately, if they have the Pegasus Shoes, runners may set up a Water Walk from the Ice Rod cave for similar results.
Just outside the lake upstream, there's a cave hidden behind a waterfall...
何かアイテムを投げこんでみま
すか?
Will you try throwing an item in?
Won't you throw something in?
If Link throws something, a large faery will appear and, if he admits to having thrown it in, will improve certain items. The Boomerang upgrades...
だから、あなたには、もっと
良い物をプレゼントするね!
So I will give you a better item!
I will give you something better
in return.
すばやく とおくまでとばせる
ようになった。
I can send it flying faster and
farther than before.
You can throw this faster and
farther than your old one!
Link's previously blue Boomerang has turned red, sparkles when thrown, and also gets the listed improvements.
The faery will also upgrade Link's shield, with the same generic upgrade dialog as for the Boomerang.
火の玉くらいなら、へっちゃら
だぞ!
Anything up to a fireball
or so is no problem!
Now you can defend yourself
against fireballs!
Link's shield is now bigger, fancier, and red. It blocks everything it did before, plus ordinary (small) fireballs, but not the oversized variety.
The faery will also fill empty bottles with green potion (recovers magic), free of charge.
The ALttP Randomizer removes this dialog, instead placing two treasure chests with random items in the cave. Approaching the spring with an empty Bottle will automatically toss it in, and the faery will return it, usually with something inside. The exact contents are randomly chosen when the seed is generated.
Exploring elsewhere, Link finds an island cave in the middle of Lake Hylia...
ルピーを投げると、のぞみが
かないます。
Throw rupees in and your wish will come true.
Throw some Rupees in and your
wishes will surely come true.
It only gives a (mostly) meaningless luck forecast until Link throws a hundred rupees into the spring.
It seems that the luck forecast actually does have a slight effect: the worst one prevents the next ten enemies Link kills from dropping anything, while the best one instead guarantees that the next ten enemies he kills will drop something (this has no effect on enemies that can never drop anything or that always drop something anyway, and they do not count toward the ten total, either).
Every 100 total rupees, a faery appears and offers a choice...
ようにしましょう。
私があげられる小さな幸せです
carry {num} bombs.
This is a small blessing I can give.
carrying ability so you can
carry {num} Bombs at maximum.
This is just a small happiness
I can give to you.
Fill the amount in the blank. Link starts with a capacity of 10 and each wish increases it by 5, except that the final increase goes from 40 to 50.
しましょう。
私があげられる小さな幸せです
carry {num} arrows.
This is a small blessing I can give.
carrying ability so you can
carry {num} Arrows at maximum.
This is just a small happiness
I can give to you.
Fill the amount in the blank. Link starts with a capacity of 30 and each wish increases it by 5, except that the final increase goes from 60 to 70.
The faery appears again with the same offer for every additional hundred rupees. If the selected carrying capacity can't increase any more:
の力にならないわ…。
ごめんなさい。
かわりに、私のともだちをしょ
うかいするわ。 願いのタキに
いるカワイイ子よ!
ルピーは、おかえしします。
あなたが、幸せでありますよう
に…。
any more than this...
My apologies.
Instead, I'll introduce you to
my friend. She's a lovely girl
in the Waterfall of Wishes!
I shall return your rupees.
May you be fortunate...
for you, but a friend of mine
might be able to...
She lives in the Waterfall Of
Wishing near Zora's lake.
I will return your Rupees to
you. May you be happy...
The ALttP Randomizer replaces all that with something more like the game's usual shop interface, where you can buy either or both types of upgrades for 100 Rupees each just by taking them. Purchased upgrades return upon leaving the cave and re-entering, until you've reached the maximum levels. Racers don't usually bother coming here unless they need a quick refill, since buying a capacity upgrade also provides that.
Along the river north of Lake Hylia, a man is camping out and resting in the shade under a bridge...
たいへんそうだが オレの
やれる物は こんなもんだけだ
Looks like you're having a rough time,
but this is about all I can do.
a heap of trouble, but this is
all I can give you.
He hands Link another Bottle. It couldn't hurt.
Unsurprisingly, his item is randomized in a Randomizer run. The community often refers to this man as "the hobo".
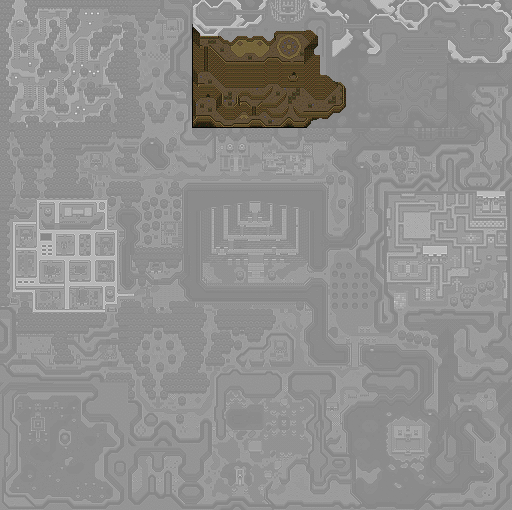
Link can now climb Mount Hebra thanks to the Power Gloves, letting him close in on the final crest in the tower at the summit. While passing through the caves, he encounters a lost old man...
ら、連れて行ってくれぬか。
ランプをなくしてしまうての。
to the mountain, would you take me along?
I've lost my lamp.
if you are going to go up
the mountain, will you take me
with you? I lost my lamp,
so...
As Link continues, the old man, who seems to be quite familiar with the caves, makes occasional comments.
穴が開いておるでな。
そこを右へ行ってくだされんか
お若いの、あんたもやっぱり
『黄金の力』を求めて 山へ
行かれるのか?
この先は魔物の山じゃ。
たくさんの男達が『黄金の力』
を求め この山で消えていった
悪いことは言わん。あんたも
深入りせんことじゃて…。
There are open holes.
Would you go to the right here?
Youngster, are you another one
going to the mountain to seek
the Golden Power?
Beyond here is a mountain of monsters.
Many men seeking the Golden Power
have vanished in this mountain.
For your own good, you'd best
not get too caught up with it...
There are holes in the ground.
Could you turn right here?
Young man, are you also going
to the mountain to look for the
Golden Power?
Just ahead is a mountain full
of monsters. Many people have
vanished in this mountain while
looking for the Golden Power.
I don't want to steer you
wrong, so please don't get too
involved in such a mad quest.
悪いことは言わない (warui koto wa iwanai, literally "I won't say something bad/wrong") and its variants tend to appear when prefacing something that the listener really ought to pay attention to, for their own good, even though more often than not they aren't likely to want to hear it.
ワシにもなあ、あんたくらいの
まご娘がいてのう…。
国王に お城に連れて行かれて
戻ってこぬ… イケニエなど
きっと司祭のたくらみじゃ!
魔法陣を封じた7賢者の力を
うけつぐ娘たちを捕えて、その
力をりようするつもりじゃ。
I have a granddaughter around
your age, myself...
She was taken to the castle by the
king and hasn't returned... this sacrifice
nonsense must be the priest's scheme!
By seizing the girls inheriting the power of the
Seven Sages who sealed the magic crests,
he intends to make use of their power.
You know, I have a
granddaughter who is your
age... The King took her to the
castle and she never returned.
Kidnapping those maidens must
be part of the wizard's plot!
I'm sure he is trying to
somehow use the power of the
descendants of the wise
men...
Going by context here and in other places I've seen the term, 魔法陣 (mahoujin) seems to refer to the intricate symbols inscribed for the performance of certain styles of magic. I can't think of a better term for them, even though there probably is one. The pentagram is one of the simplest examples.
どこかで生きておる。それを
救う『勇者』が現れる時を
ワシは信じてまっておる…。
おっ、つい話こんでしもうたの
年よりに色々と ありがとう。
おお、そうじゃ。もし魔法陣に
迷いこんだ時は、このカガミに
あんたの 姿をうつしなさい。
somewhere even now. I believe
in and await the appearance of
a Hero who will rescue them...
Oh dear, I've rambled on.
Thanks for all you've done for an old man.
Oh, yes. If you ever happen to
stray into a magic crest, reflect
yourself in this mirror.
alive somewhere. I believe that
a Hero will rescue them...
I wait for that day...
Uhh... These are dangerous
times... I talked too much.
Anyway... Thank you for your
kindness to an old man like me.
Uhh... I wanted to give you
this. If you wander into
a magical transporter, gaze
into this mirror.
青く すんだ 美しいカガミ…
すい込まれそうな気がしてくる
It's a beautiful clear blue mirror...
I feel like I'll be sucked into it.
This mirror is blue, clear and
beautiful...
You feel like it is going to
absorb you into another world...
The full purpose of the mirror is explained in more detail below.
The old man enters another cave, avoiding the falling boulders on the face of the mountain. Link follows him in to find a modest but livable dwelling.
ておる。 司祭は魔の力の通路
を開こうとしておるのじゃ。
山の上の塔には、ムーンパール
と呼ばれる玉がある。必ず見つ
けなされ。
わしが、あんたにしてやれるの
は、つかれをいやす事くらい…
いつでも来なされ。
by the priest. The priest is trying to
open a passage of diabolic power.
In the tower on top of the mountain
is an orb called the Moon Pearl.
Be certain to find it.
Just about all I can do for you is
soothe your fatigue...
Come any time.
King, and now he is trying to
open the way to the
Dark World. To complete
your quest, you will need
the Moon Pearl, which is in the
tower on top of the mountain.
All I can do for you now is to
comfort your weariness...
Come back here any time.
The old man recovers Link's health, and Link proceeds onward.
After rescuing the old man, this cave is added to the list of starting locations when loading a saved game.
The ALttP Randomizer considers the Lantern logically required to rescue the old man and get his item, though the cave is fairly simple, so it's not uncommon for runners to go in and get him as soon as they have mountain access, Lantern or no. Since he also provides free healing, and the exit is much closer to where you start than in the church, runners will often start here for "old man kisses" after a save and quit once they have the Ocarina.
Just as the tower finally comes into sight, the mountain becomes too steep to climb any further. It's too soon to give up, though. One of the smaller caves has another telepathic tile:
のことば、よくきくのじゃ。
メガネイワにのぼるのじゃ。
そうすれば、このヘブラ山の
ヘラの塔へたどりつけるじゃろ
う。よくかんがえることじゃ。
that I, Sahasralah, speak.
Climb Spectacle Rock.
Do so and you should be able to
make it to Hera Tower here on
Hebra Mountain. Think it over.
You must somehow make your
way to the top of Spectacle
Rock. From there you can
reach the Tower of Hera on
top of Death Mountain.
Spectacle Rock has to be the glasses-shaped rock near the summit. From atop it, reaching the tower would be easy. The problem is how to get up there.
A little more exploration turns up something interesting: a shimmering blue tile in the center of a ring of stones. Link tries stepping on it... the screen blurs, fades to white, then fades back in, leaving Link standing in the same place... sort of. There's no sign of the shimmering tile, the ring of stones is now a ring of bushes, everything looks more barren, the tower to the north glows menacingly, and let's not forget that Link has mysteriously transformed into a humanoid pink bunny, which is particularly problematic since he can't use his sword like this... or shield, or... much of anything, really. He can't even lift light objects. Just about all he can still do is walk around.
Collecting items still works, as long as they're lying out in the open. So do talking to NPCs and pushing blocks, but not opening chests, lifting objects, or even reading signs. Armor still functions if you happen to have any. Other than that, the only items that you can still use are Bottles and the Mirror. You can reportedly also use Mudora's Writings and give away the Mushroom, but under normal circumstances, you can't be a bunny anywhere either one applies.
(There are also several ways to enter a glitched Super Bunny state that enables most non-item actions despite being a bunny, by doing various things that the game's programming didn't anticipate, such as entering a location by falling through a hole, or using the Mirror on the same frame as walking into a cave.)
Only a small portion of this strange, yet strangely familiar, world is currently accessible. Most of it is equivalent to the reachable portion of the other version of the mountain, but there are a few critical differences, including the lack of any exit.
On the plus side, there are no enemies whatsoever in this area, and with the bunny's inability to lift anything, there's not even the possibility of finding something dangerous under a bush. As if that weren't enough, the cave at bottom left even has a faery fountain for full healing.
There are two strange creatures nearby. One looks like a ball with legs and eyes:
あれっ、あんたは、ウサギさん
になったんだね…。
そうだよ、この世界は、ぼく達
の住む世界と、よくにた地けい
だけど、ちょ~っとちがうのさ
そのうえ、迷いこんだ間は、
その人の心をうつした姿に、
かわってしまうんだよ。
おいら、コロコロ気がかわるも
んで、ボールみたいになっちゃ
ったぜ…
でも、ムーンパールって玉が
あればもとの姿に戻れるらしい
んだ…。 ゴロンゴロンゴロン
Hm, you've turned into a
rabbit, I see...
Right, this world and the world
we live in have very similar terrain,
but they're a weeee bit different.
On top of that, while they're lost
here, people change into a form
that reflects their heart.
I change my mind a lot,
so I became like a ball...
But, if you have an orb called the Moon
Pearl, you can return to your original form,
or so I hear... roll roll roll
This world is like the real
world, but evil has twisted it.
The Golden Power is what
changed your shape to reflect
what is in your heart and mind.
I am always changing my mind,
so I turned into a ball...
But if you have a ball called
the Moon Pearl, you can keep
your original shape here.
ゴロン (goron) is the sound of something heavy rolling. コロコロ (korokoro), the "sound" of something changing frequently (like his mind), is also the sound of a small round thing (like a ball) rolling. Unlike in the US version, ball-guy makes no mention of why things are as they are... probably he has no way of knowing.
...and there's also a creature that looks like a human-sized oni (ogre is close enough if that's not a familiar concept), who is kicking ball-guy around:
このウサギヤロウ!
せっかく『黄金の力』を
いただこうと思ってこの世界に
きたのに、こんな姿になるし
もとの世界に帰れねェ…。
ヘラの塔にある、ムーンパール
てエ玉さえ手に入ればもとの姿
に戻れるってことだが…。
オレは、ムシャクシャしてるん
だぞ、コノヤロウー!
あっちへ行けっ。シッシッ
you goddamn rabbit!?
I went to all that trouble to come to this
world thinking I'd take the Golden Power,
and now I'm stuck like this and I can't
get back to the world I came from...
If I could just get that Moon Pearl
orb in Hera Tower, I could turn
back to my original form...
I'm pissed off, you bastard!
Get lost. Shoo, shoo.
Do you have something to say
to me, silly rabbit?!
I came here to get the Power
Of Gold but now I'm a freak and
I can't go back to the real
world! If I only had the Moon
Pearl from the Tower Of Hera, I
could go back to my original
shape! I've got good reason
to be stressed out!
So back off! Shoo shoo!
Interestingly, Spectacle Rock doesn't exist in this world. There's just flat ground there. Link stands where Spectacle Rock should be and uses the Mirror... there's a transition just like the one caused by the warp tile, and Link is back to his original world, in his original form, and standing on top of Spectacle Rock! A small distortion remains, which Link can use to go back to the other world if he so chooses.
Combining the warp tile with the Mirror gives access to the top of the mountain, but only the western half. Large wooden pegs block access to the east from the bridge at the top, just as a broken bridge further down the mountain prevents crossing there. The Mirror will have further uses in the future, but with access to only a small portion of the other world, this is it for now.
In a Randomizer run, if you happen to get the Hookshot and Hammer before the Mirror, you can reach Hera Tower (assuming you have mountain access at all) by crossing to the eastern side at the broken bridge, climbing up through the cave system, and crossing back to the west on the upper bridge.
Also, if using Inverted world state with the Randomizer, the usual Mirror-based method of climbing the mountain does not apply due to certain functionalities being reversed between the two worlds. Instead, a stairway is added in the other world that leads directly to the creepy glowing tower. The usual entry restrictions for that tower are also removed, and its usual contents are swapped with the usual contents of the Hyrule Castle tower.
Not far west of the tower stands a tablet inscribed with a message in Hylian. Link uses Mudora's Writings to read it...
されば エーテルの魔法を
えられん。
Thus shalt gain the magic of Ether.
you will get the magic of
Ether.
Not very useful now, considering Link doesn't have the Master Sword... Still, it's something to remember.
The ALttP Randomizer puts a random item on the tablet. As in the base game, you need Mudora's Writings and the Master Sword or better (or Hammer in Swordless mode) to retrieve the item. Regardless, the inscription indicates what's there ahead of time if you read it before you can get the item.
The tower has a more open layout than the previous areas. Large centipede-like creatures wander around randomly. On the higher floors are squid-like monsters that bounce Link away when he hits them. Most floors have holes in the floor that lead to the floor below, and some of these holes actually change position when Link steps on star-shaped tiles. Finally, this area introduces crystal switches, which alternately raise and lower orange and blue barriers when struck.
Just inside is another telepathic tile...
長老サハスラーラじゃ。
お前に、助言をあたえよう。
魔物のヤカタでマジカルミラー
を使えば、いつでも入口に帰る
ことができる。忘れるでないぞ
Elder Sahasralah.
I shall give you some advice.
You can use the Magical Mirror in the
dwellings of the monsters to return to
the entrance at any time. Do not forget.
elder. I have some advice...
In the dungeons, you can gaze
into the Magic Mirror to return
to the entrance at any time.
Do not forget this!
That's useful in case of getting stuck, and often comes in handy as a shortcut, especially in speedrunning. Without the Mirror, it's not uncommon to see runners do what's called taking a death warp, which is a fancy way to say dying on purpose to restart at the entrance. Using the Mirror is quicker and cleaner.
In the basement is the big key, beyond a room with attacking tiles that Link has to wait out and a four-torch puzzle.
The Randomizer community calls the room with the attacking tiles "Coffee Break Room", since retriggering the switch while Link is standing on the blue blocks gives him invulnerably by overlap until he moves off. The assault lasts long enough that the player could go do something else for a bit, if they felt like it.
The big key unlocks the door to go higher up the tower. Several floors above is another telepathic tile...
この塔には、ムーンパールと
よばえる玉がおかれておる。
その玉を持つ者は、魔物の世界
にあっても、姿がかわらぬよう
守ってくれるのじゃ。
必ず手に入れて塔を出るがよい
忘れるでないぞ…。
Placed in this tower is an orb
known as the Moon Pearl.
This orb protects its holder so that
their form will not change even
in the world of the monsters.
You should make sure to acquire
it before you leave the tower.
Do not forget...
elder. An orb known as the
Moon Pearl is in this tower.
Whoever holds the Moon Pearl is
protected so that his form will
not change in the Dark World.
You must find it and escape
from the tower!
Don't forget the Moon Pearl...
The chest with the Moon Pearl is in plain sight but out of reach. Link must shift the holes in the above floor and jump down to reach it.
Alternately, a Bomb Jump works, too, and is somewhat faster if executed correctly the first time. A Randomizer run may also give the option of Hookshotting to the chest, then using the Pegasus Shoes to bounce off of it to get back (crossing with the Hookshot will trigger the star tiles, which the Bomb Jump won't).
悪しき者が使う黄金の力から
勇者を守り姿をかえさせない。
It protects the Hero from the evil one's use of the
Golden Power and won't let his form change.
This protects The Hero from
the changing effects of the
Golden Power.
Jumping into a hole lined by railings on three sides in the top left corner of 5F drops Link into a large pot on 4F, through that into a large pot on 3F, through that into a large pot on 2F, and finally into an uncharted room with two faeries and a warp tile that goes back up to 5F. In a Randomizer run, using a glitch called Herapot (there are several setups, none of which I'm adequately familiar with to explain) allows a player with the Hookshot to clip directly into the pot on 2F without first climbing the tower. This also allows for skipping the big key entirely if it's in its inconvenient regular location, though that also means skipping the contents of the big chest, which can be a gamble if it's not the map or compass. Using Herapot is also somewhat faster than climbing the tower the usual way even if you have the big key, as long as you don't fail the attempt more than once or twice.
The boss, found of course on the top floor, is a giant armored centipede-like monster. Its only vulnerable point is the tip of the tail, and taking a hit or striking the head knocks Link away, which is a problem since there are holes all around. Only the sword (and Hammer if you have it) affects the boss, but at least it can't handle many hits. It moves faster when near death, and the fight resets if Link falls to the floor(s) below, but all this is generally more frustrating than truly dangerous. When slain, the boss drops a heart container as usual, and a red pendant falls into the middle of the room.
やった!3つの紋章がそろった
マスターソードの森へ向おう!
All right! That makes all three crests.
On to the Master Sword's forest!
With this, you have collected
all three Pendants! Go now to
the Lost Woods to get
the Master Sword!
Again, the messages for collecting the last two are swapped (though translated differently in the English version) if you get them in reverse order:
またひとつ、強くなったぞ!
さあ、さいごの紋章へ向おう!
I've gotten another step stronger!
Now, let's head for the last crest!
Again your power has increased!
Now, go for the last one!
For Randomizer purposes, Hera Tower contains a map, compass, small key, and big key (if these aren't shuffled beyond their usual dungeons), and two other items. Two locations never have any requirements beyond entering the dungeon, the chest in the basement past Coffee Break Room always requires the Lantern or Fire Rod to light torches, and everything else, including the boss and whatever it drops, logically require the big key. If that's in its vanilla location, a fire source is logically required to clear the dungeon and check all three item locations on the upper floors, otherwise they have no requirements beyond entering the dungeon.
If you're lucky, Coffee Break Room only leads to the map or compass, or, better yet, the small key needed to go down there in the first place, so you're not even tempted to try checking (on typical Randomizer settings, keys are allowed to lock themselves in as long as they don't lock you out of anything else).
On the way down, Link can stop by the old man's cave.
勇者のオマモリじゃ。人の姿を
かえる魔力から守ってくれる。
それを手に入れたあんたこそ
ワシのまっておった勇者じゃな
どうか娘を助けてやってくれ!
heads to the sacred land. It wards against the
magic energy that changes people's forms.
You who have obtained it are
surely the Hero I have awaited.
Please save the maidens!
bearer from the magical air of
the Golden Land, so you can
keep your human shape there.